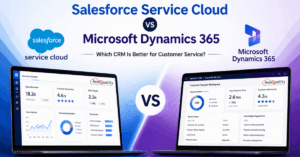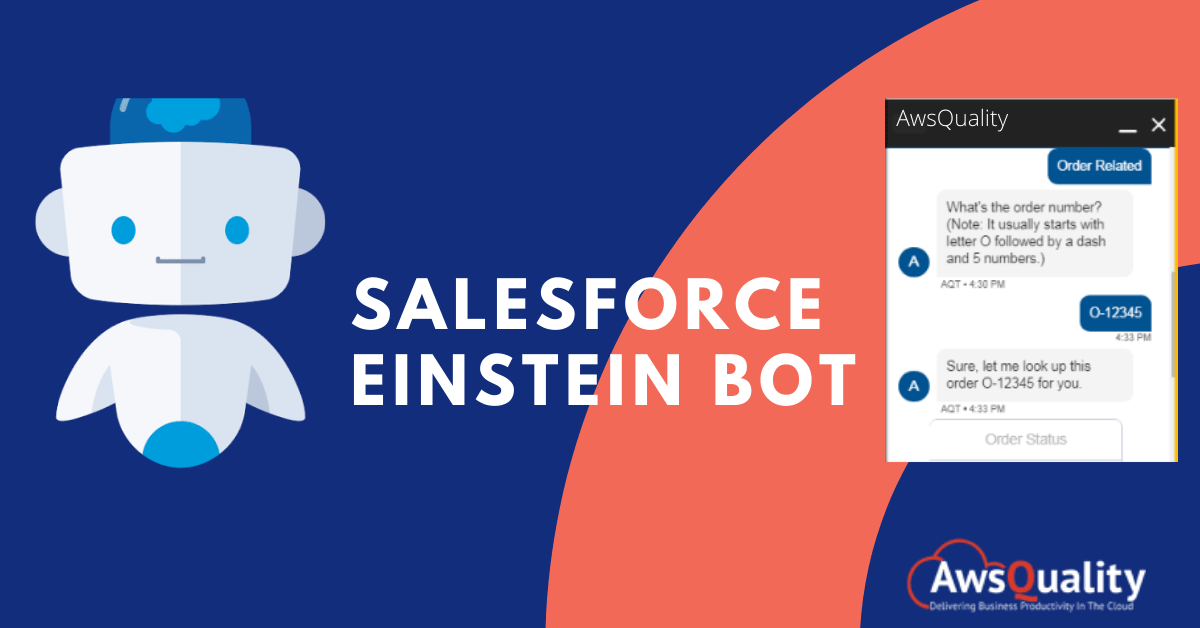
Einstein Bots are part of Service Cloud. They are designed to augment your human call center agents.?This enables customers to quickly and accurately interact with agents without waiting for a human agent to become available. Bots provide a chat-based interface to customers which means that they can send messages, ask questions from customers and take actions based on defined rules and/or customer input.
Why is it needed?
In order to eliminate work load from your service agents, organizations are moving further to configure it. Bots can efficiently manage the routine requests and free your agents to handle more complex issues. Bots have capability in gathering pre-chat information to save your agents precious time.
Editions Required
Einstein Bots is available in Salesforce Classic and Lightning Experience. Einstein Bot setup is available in Lightning Experience.
Available in: Enterprise, Performance, Unlimited, and Developer Editions of Salesforce.
Advantages
- It can chat with a lot more customers at the same time and it can do it faster than any of the agents.
- In case the customer did not get attention from the actual agent then Bot smoothly transfers the customer to an available agent.
- It understands customers in a more smarter way.
- Agents can have more time to work on complex customer issues or values added activities. Less agents handle time, less wait time, better user experience, more happy customers.
- Customers are welcomed with a grand greeting, and also redirect them to the relevant agents whenever they feel the need for the same.
- Using NLU (Natural Language Understanding) technologies, bots can learn how to respond to customers appropriately and let agents do the heavier lifting.
- Being smart enough, chatbots are responsible for quick and intelligent responses to the customers? queries, and let agents focus only on the complex work.
Also Check: What Are The Advantages of Salesforce Einstein Discovery?
How to set up?
Here we will discuss the steps to configure Einstein Bot below…
Publish your Community
- Enter Communities Settings in the Quick Find box after accessing setup, then select Communities Settings.
- Select Enable communities.
- Enter a unique domain name and click Check Availability.
- Click Save.
- Click OK.
- Click New Community.
- Select the Customer Service template.
- Click Get Started.
- Name the community as per your choice.
- Click Create.
Run the Chat Guided Setup Flow
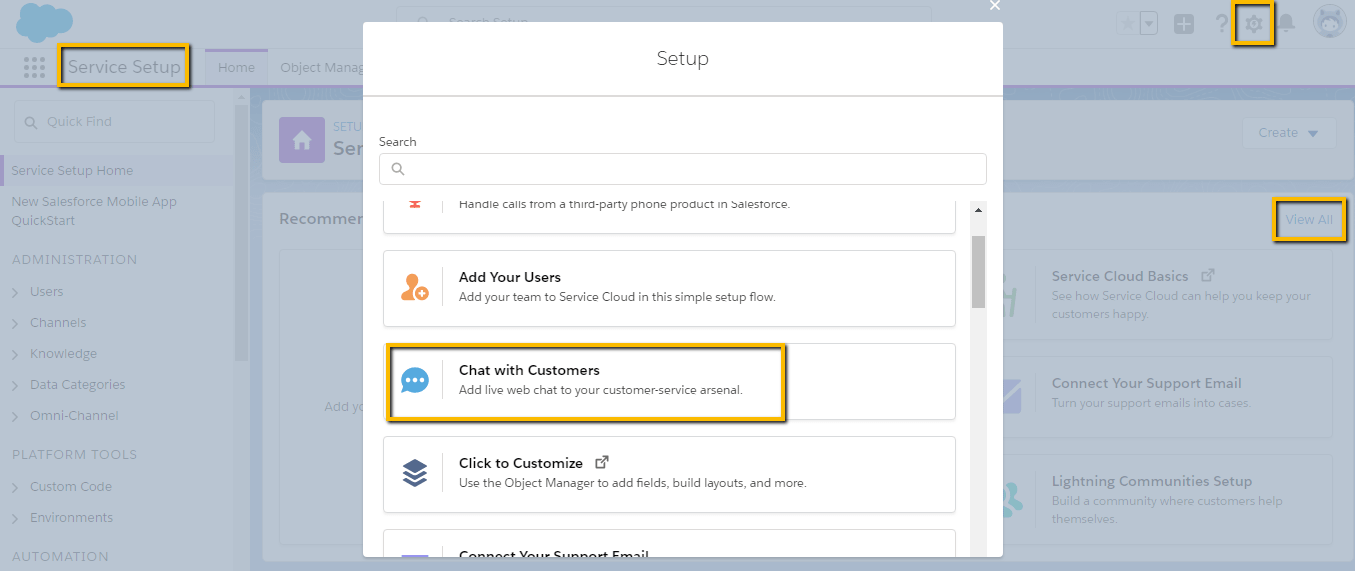
- Go to Salesforce Setup.
- Copy the URL that is associated with the community.
- Click on Service Setup to access Service Setup Home.
- Click on View All and select Chat with Customers.
- Click Start.
- For Queue Name, enter FAQs.
- For Name this Agent Group, enter any name.
- Click the plus sign next to your name, and click Next.
- Keep your agents? chat workload as is, and click Next.
- For the Website URL, paste the URL you copied from your community.
- Click Next.
- Click the Service tile, then Next.
- Keep Offline Support off, and click Next.
Adding the Chat widget URL to your community?s security settings to allow live web chat.
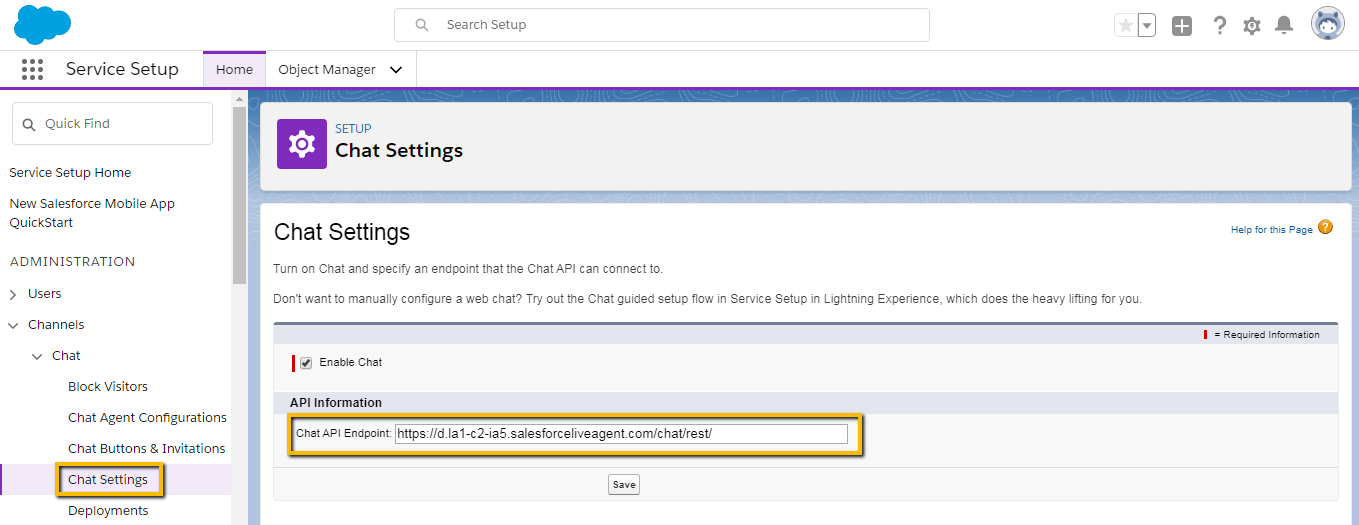
- From Setup, type Chat in the Quick Find box and select Chat Settings.
- Copy the URL in Chat API Endpoint.
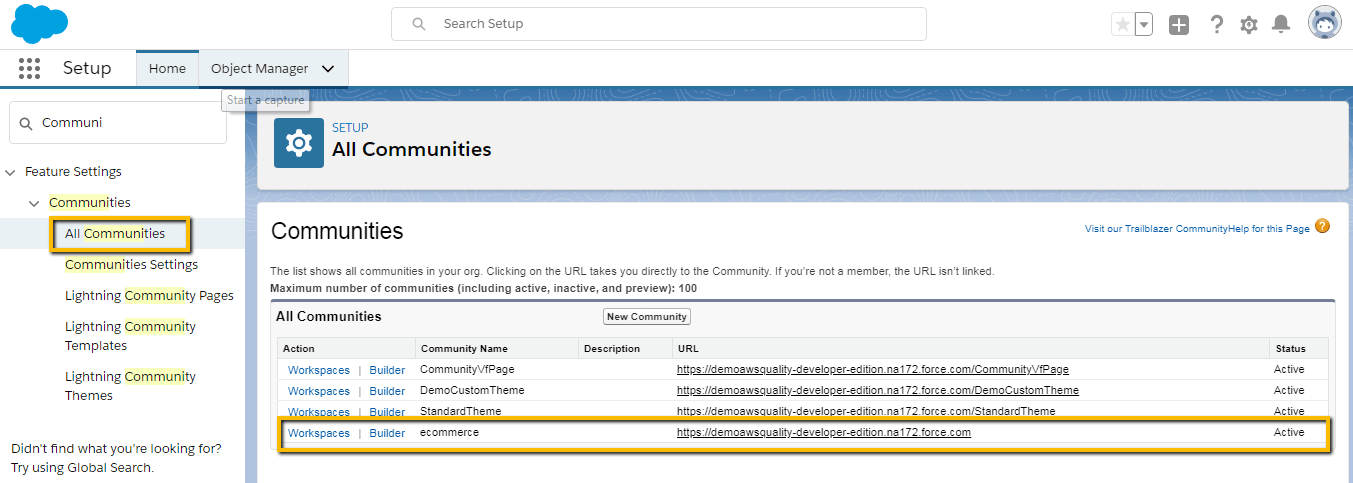
- Access Setup >> enter Communities in the Quick Find box, then select All Communities.
- Click Builder next to your community.
- Click the Settings icon in the upper left.
- Click Security.
- Change the default Content Security Policy (CSP) from Strict CSP: Block Inline Scripts and Script Access to All Third-party Hosts (Recommended) to Allow Inline Scripts and Script Access to Whitelisted Third-party Hosts.
- Click Allow in the popup window.
- Click + Add Trusted Site in the Trusted Sites for Scripts below the CSP section,
- For the Name, enter LiveAgent.
- For the URL, enter the URL you copied from Chat API Endpoint in Chat Settings.
- Make sure Active is checked.
- Click Add Site.

Add Embedded Service Chat to Your Community
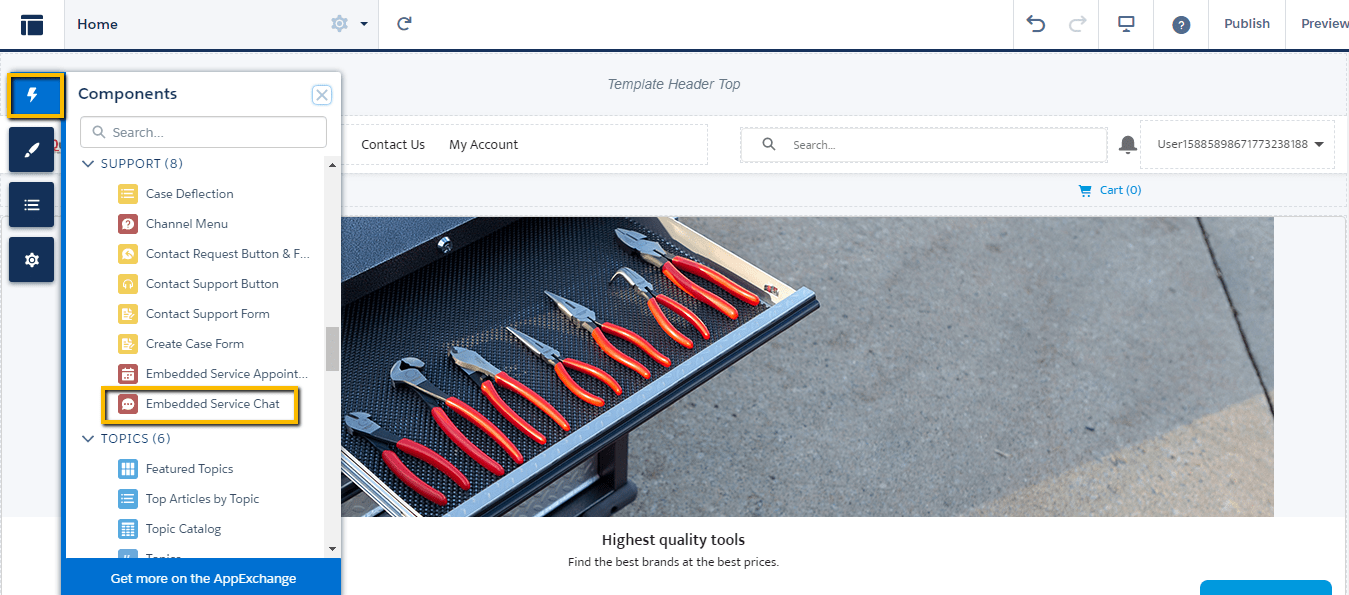
- Access Setup >> enter All Communities in the Quick Find box, and select All Communities.
- Next to your community, click Builder.
- Click the Components icon in the top-left corner to open Components and scroll to the Support section.
- Drag and drop the Embedded Service Chat to the template footer.
Set Up an Einstein Bot
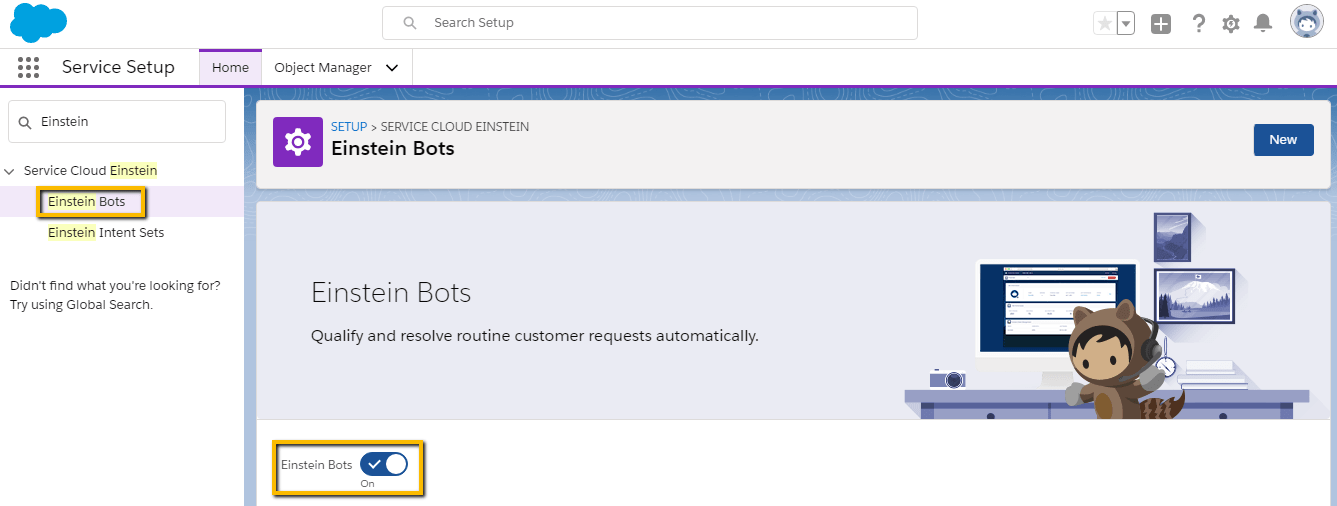
- Access Setup >> enter Einstein Bots in the Quick Find box, and select Einstein Bots.
- In the Settings area:
- Click the toggle button next to Einstein Bots to turn it On.
- Go through terms, and click the I?m authorized by my company to accept these terms checkbox to accept them.
- Click Try Einstein.
- To provide your customers with a menu of options for interacting with your Einstein Bot, click the drop-down menu next to the Bot Options Menu and select Edit.
- Select the Enable Einstein Bots Options Menu checkbox and click on the Save.
Create new Bot
- From Setup, in the Quick Find box type Einstein Bots, and select Einstein Bots.
- Click New.
- Review the welcome screen and click Next. A setup wizard allows you to go through a few screens to gather basic information about the bot, including:
- Bot Name
- Greeting
- Main Menu Options
- Let?s name our Einstein Bot and enter the description: A basic customer service bot.
- Click Next.
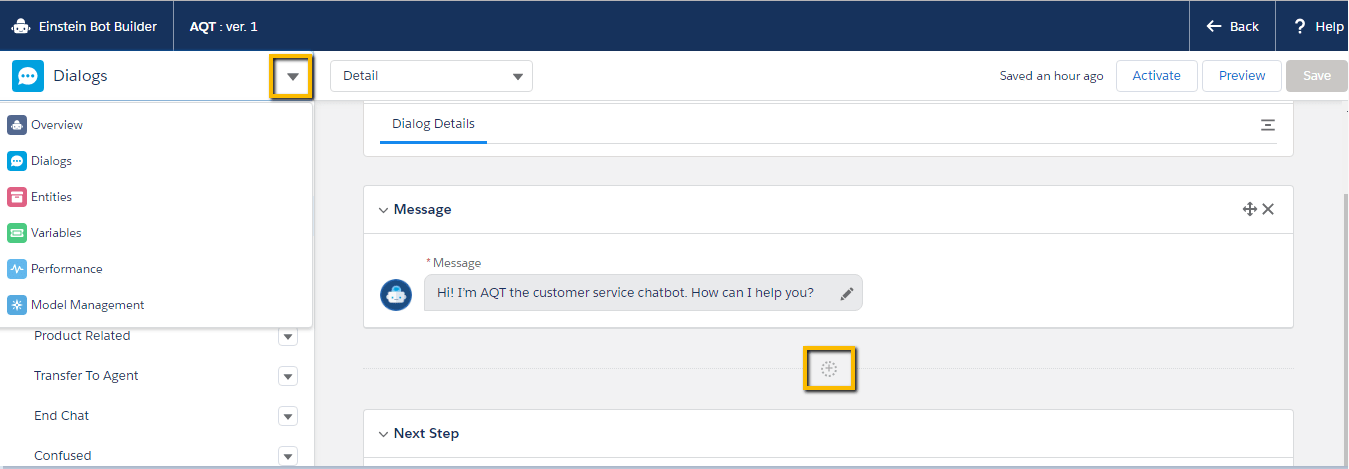
- Enter a greeting message that identifies your bot by name and ensure that it?s not a human. For example: Hi! I?m AQT, the customer service chatbot. How can I help you?
- Click Next.

Now you have to set up a menu for your customers with common issues or questions you want your bot to handle those.
- You can type any menu option that is relevant to your business needs.
- Click create and click on finish.
Add Prebuilt Dialogs and Customize the Options Menu
??Add Prebuilt Dialogs to the Main Menu
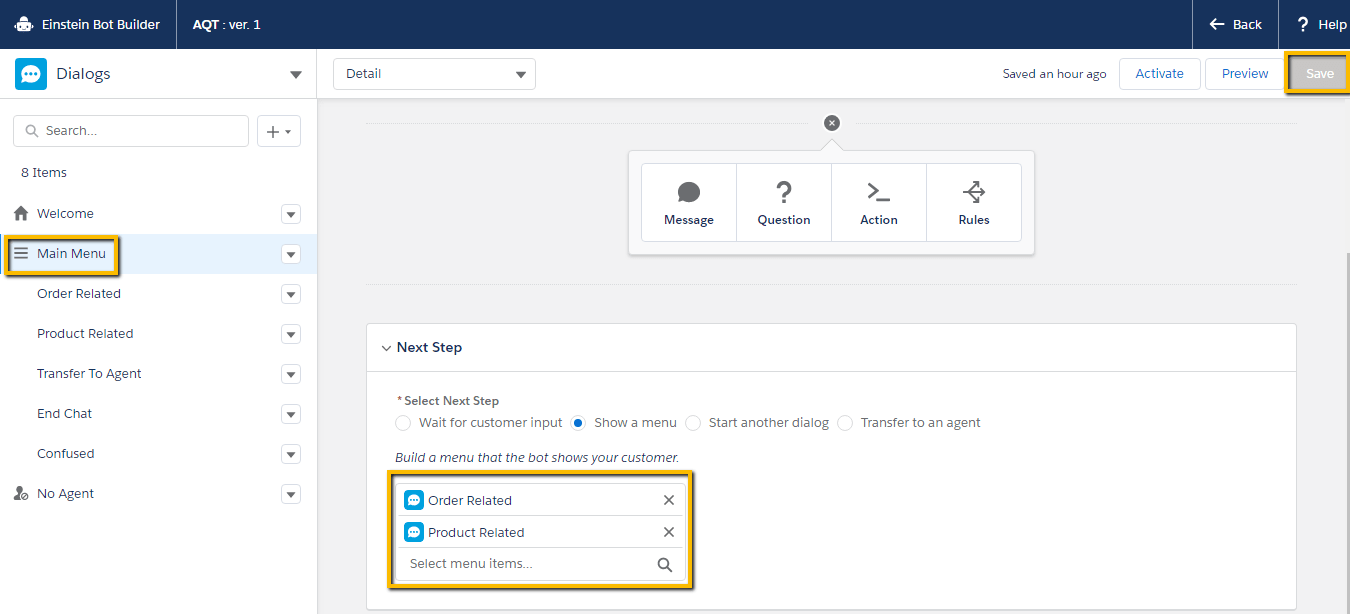
- Click the Main Menu. This is the Main Menu dialog. It consists of the menu options we specified in setup.
- Ensure Show a menu is selected.
- Click in the Select menu items search field.
- Select Transfer to Agent.
- Click again in the field and select End Chat.
- Click Save, which is present at the top right of the page.
Configure the Chat Button to Preview the Bot
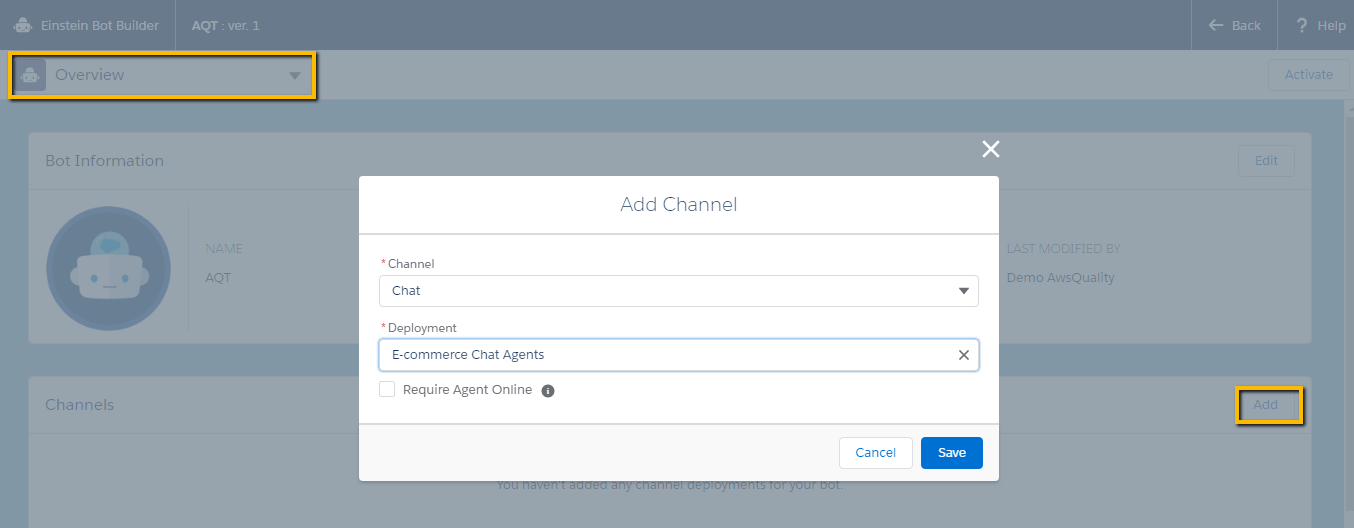
- Click Overview from the dropdown menu.
- In the Channels section, click Add.
- Select Chat from the Select an Option dropdown menu in the Add Channel window, .
- Enter some of the letters in the Deployment search box and select the Chat Agents that you have created.
- Leave Require Agent Online unchecked.
- Click save.
Create a Dialog, Submenu, and Dialog Group
? Add a New Dialog to the Main Menu
- On the Dialogs page, click Deactivate.
- Click Yes.
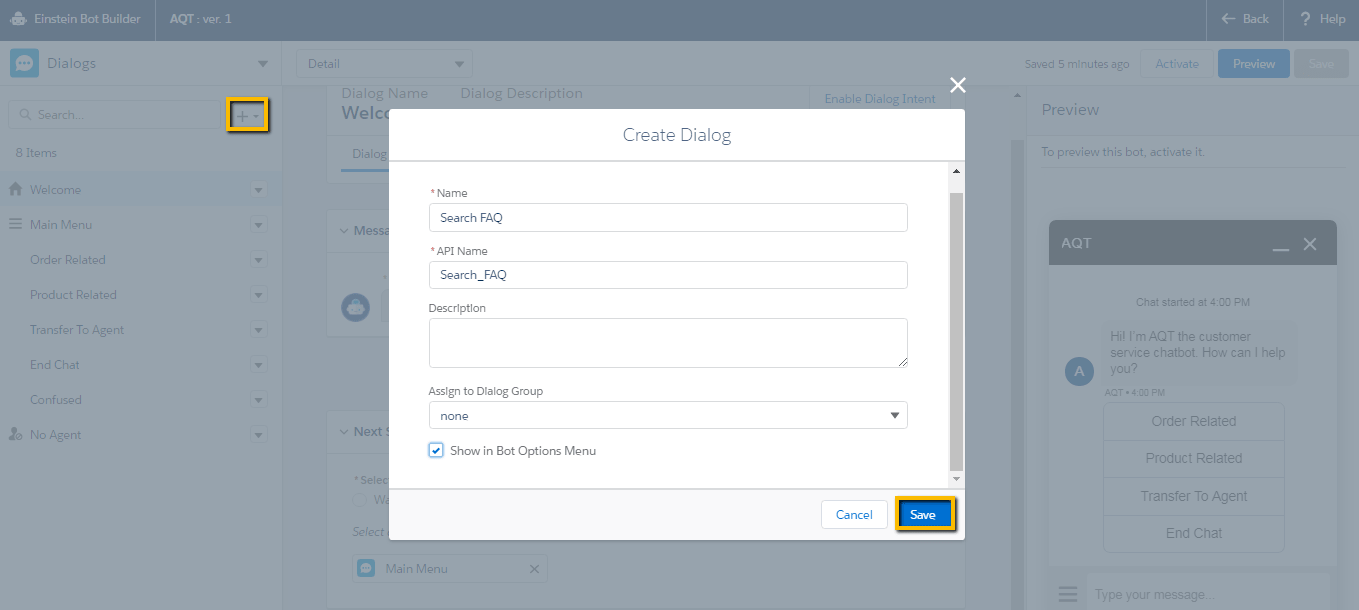
- Click the plus sign and select New Dialog.
- For Name, enter Search FAQ.
- For API Name, enter Search_FAQ.
- Leave Dialog Description blank.
- Leave the Assign to Dialog Group setting set to none.
- Select Show in Bot Options Menu.
- Click Save.
- Click the Main Menu.
- Ensure Show a menu is selected in the Next Step section.
- Click in Select menu items >> click Search FAQ.
- In order to rearrange menu items, click and drag them to the desired position >> Click and drag Search FAQ, moving it under Appointment Related.
- Click Save.
Create a Submenu
- Click on the plus sign and select New Dialog and enter the details:
- Name: Order Status
- API Name: Order_Status
- Leave Show in Bot Options Menu unchecked.
- Click Save.
- Repeat this process for Cancel an Order.
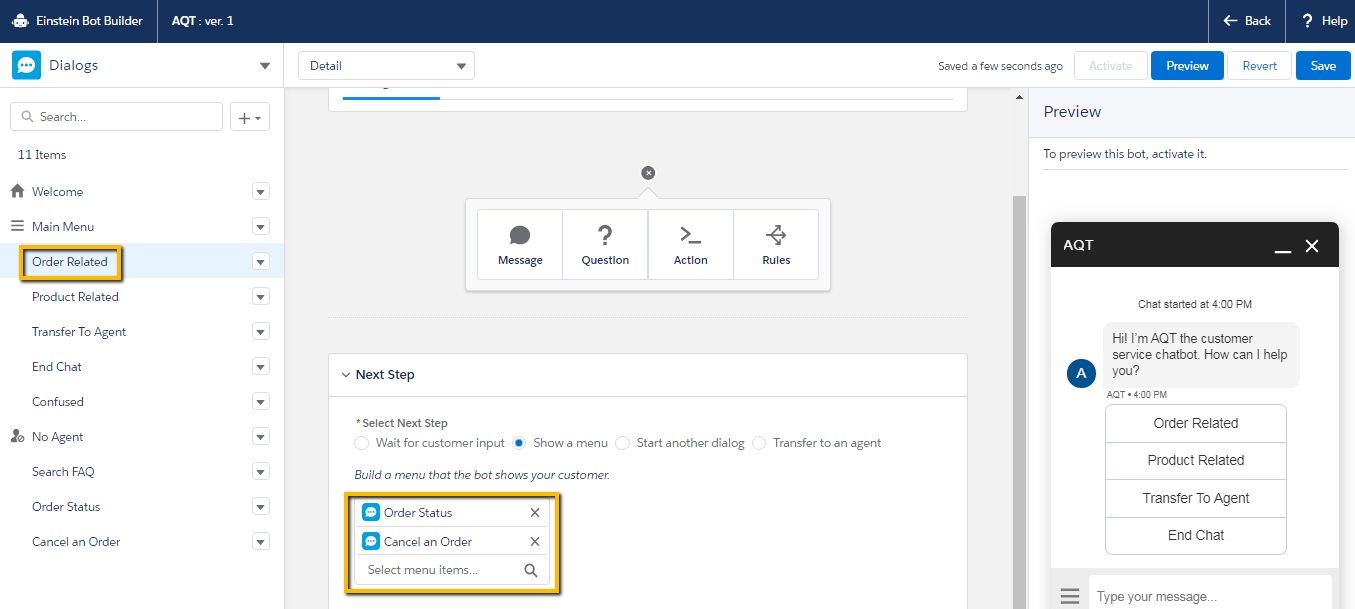
Addition of new dialogs to the Order Related menu.
- Click the Order Related dialog (in the left panel) and then select Show a menu from the Next Step section.
- Add the menu items that are recently created. Type and then after select Order Status, Cancel an Order.
- Click Save.
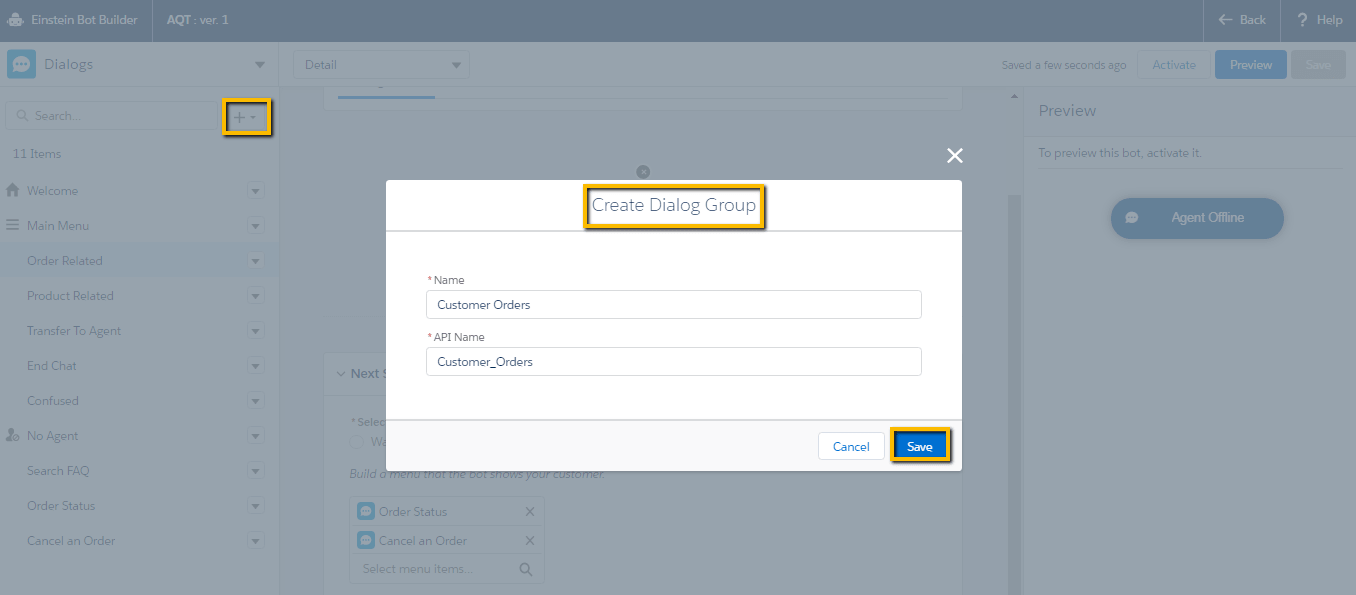
Create a Dialog Group
- Click Deactivate.
- Click Yes.
- Click the plus sign >> select New Group, and fill in the details.
- Name: Customer Orders
- API Name: Customer_Orders
- Click Save.
- Next to Order Related, click on the drop down arrow >> select Edit. Select Customer Orders in the Assign to Dialog Group field.
- Select Show in Bot Options Menu.
- Click Save.?
Bot Conversations Using Variables and Entities
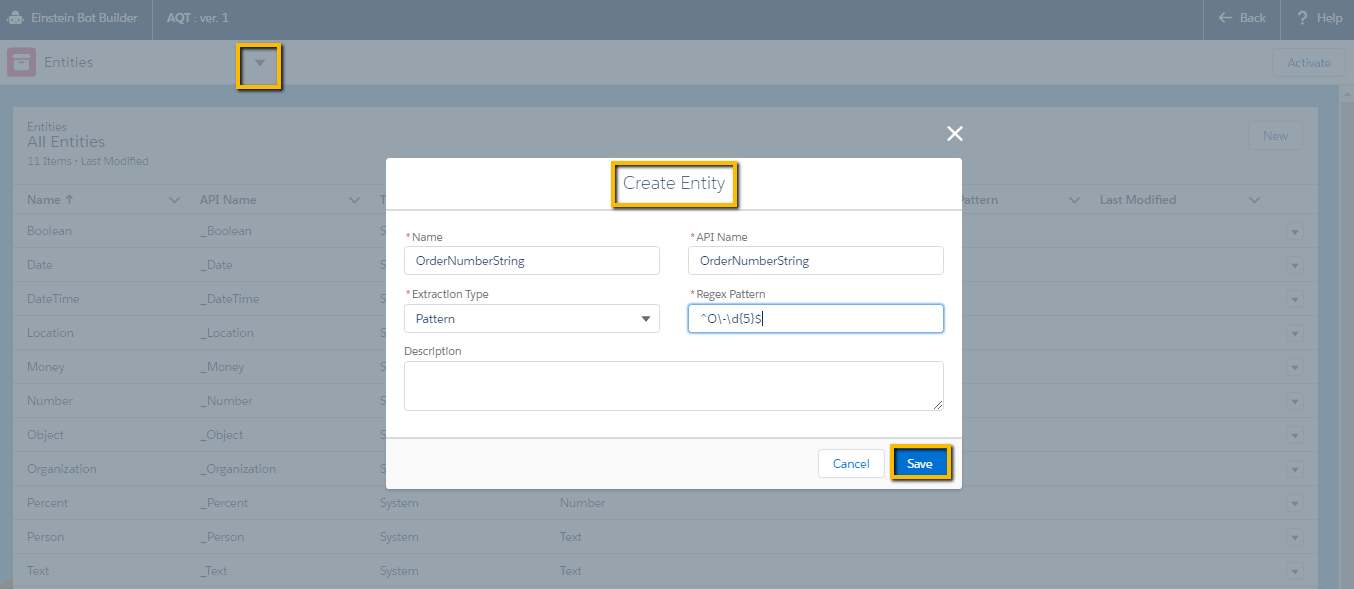
Create an Entity for Order Number
- Click the drop down arrow next to Dialog >> select Entities.
- Click New, and enter the details:
- Label: OrderNumberString
- Extraction Type: Pattern
- Regex: ^O\-\d{5}$ (Here i use regex that is a regular text expression which describes a search pattern, to ensure Salesforce stores order numbers in the proper format. The expression ^O\-\d{5}$ that allows strings that start with the letter ?O-? followed by five numbers to be stored in any variable associated with this entity.)
- Click save.
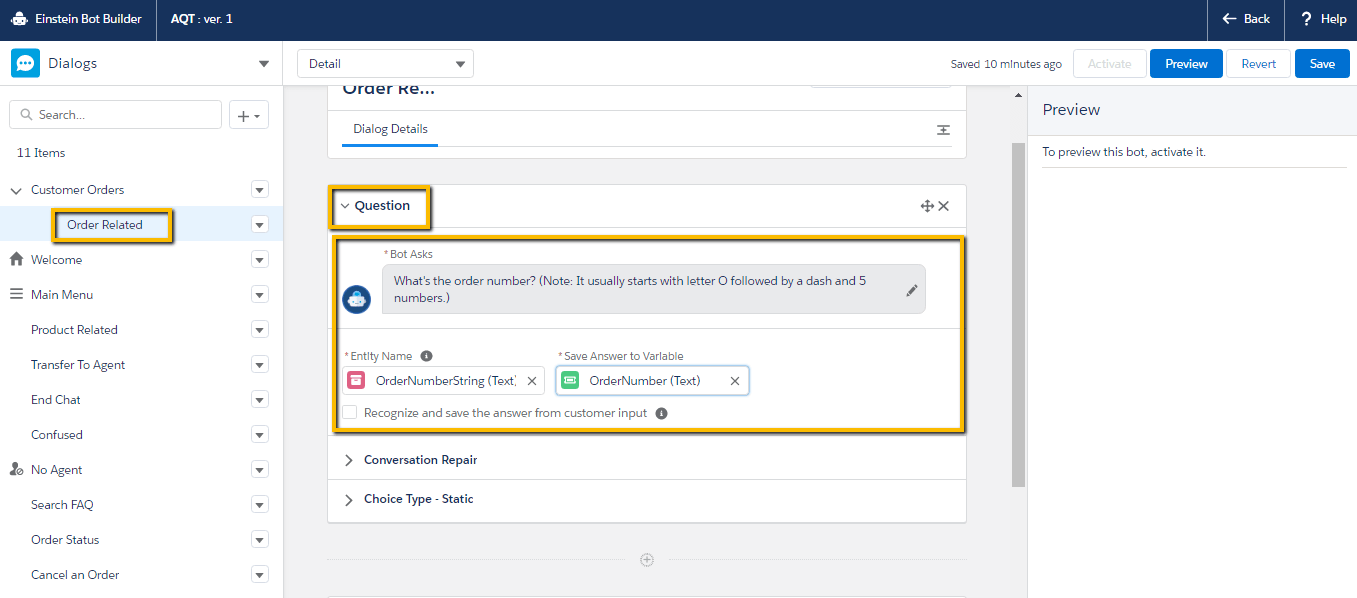
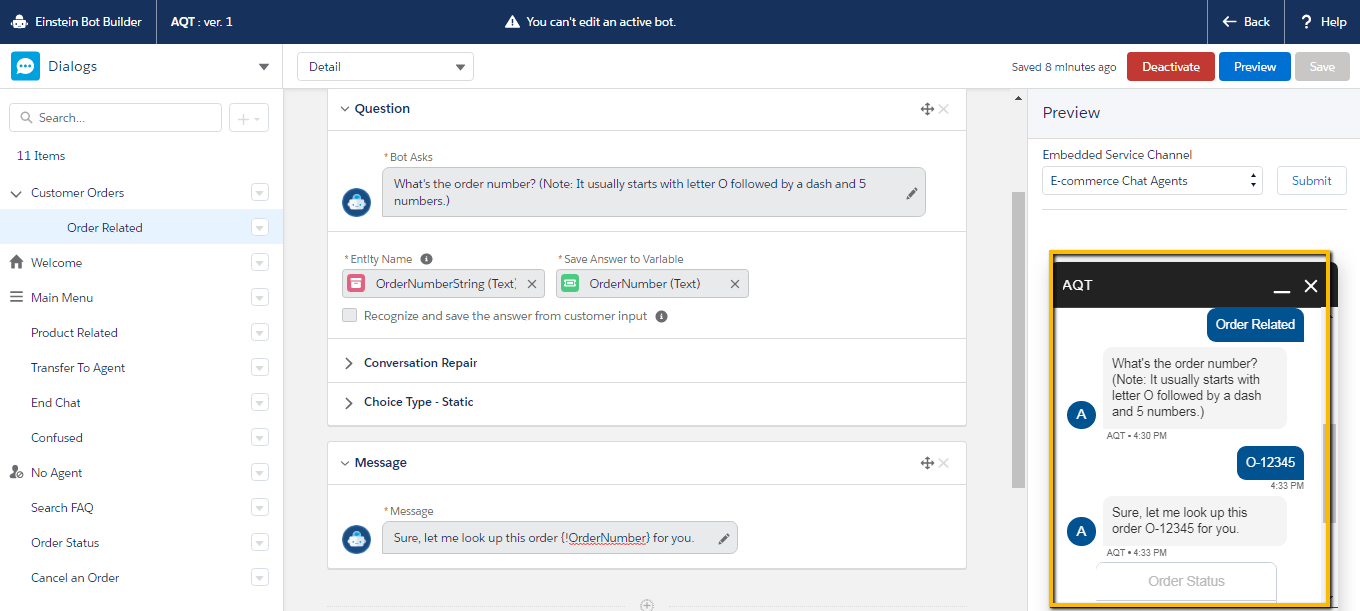
Add a Question and Create a Variable
- Click the drop down arrow present next to Entities and select Dialog.
- Click the Order Status dialog and select Question that is present in the main body of the dialog.
- In Bot Asks, enter What’s the order number? (Note: make sure that it usually starts with letter O followed by a dash and 5 numbers.)
- Set the Entity Name to the OrderNumberString (Text).
- Click in the box named Save Answer to Variable box, and Select plus sign (+) New Variable.
- Label: OrderNumber
- API Name: OrderNumber
- Data Type: Text
- Click Save.
- Click on the plus icon below the Question section and select Message.
- In the place Bot Says, enter the details like : Sure, let me look up this order {!OrderNumber} for you.
- Click save.

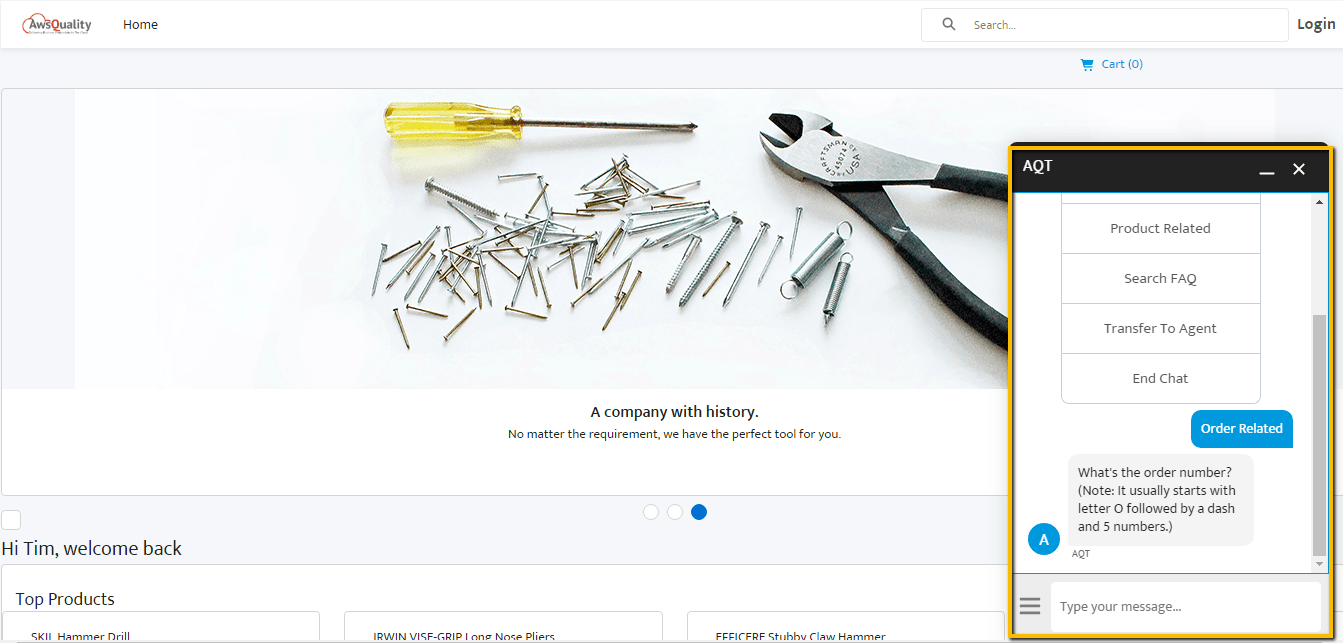
Let?s test
- Activate the bot.
- In case if the Preview panel is not open then click on Preview.
- Next to the Name of Chat Agents, click Submit.
- Click Chat with an Expert.
- Fill each and every field values in the pre-chat form >> click Start Chatting.
- Click Order Related.
- You have options to click either one New Message or scroll down the chat window and subsequently click on Order Status.
- Enter O-12345 (example) and press Enter.
Now you can see your conversation below in the main community that you have created.
Conclusion
Organizations are moving forward to configure the Bot that can efficiently manage the routine requests and free your agents to handle more complex issues. Bot enables customers to quickly and accurately interact (Customers can send messages, ask questions and queries from Bot) with them without waiting for a human agent to become available.
?
 Bio
Bio