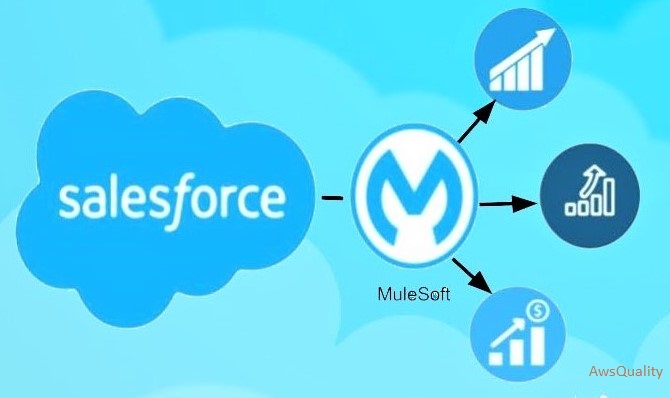
Salesforce.com is a customer relationship management (CRM) software program that may be used for sales, service, marketing, analytics, and creating unique applications.
MuleSoft is a company that offers businesses outstanding business agility by integrating devices, data, and applications across on-premises and cloud environments using an API-led methodology. The best integration platform for SOA, SaaS, and APIs in the world is MuleSoft’s Any Point Platform.
Benefits of Integrating MuleSoft and Salesforce
Organizations are quickly integrating their utility with other systems to align their business processes and increase efficiency. Below are some benefits of MuleSoft-Salesforce Integration
Successful Customer Management
With the MuleSoft Platform, Salesforce can easily be linked to any program, including Marketo and ServiceNow, which helps to track customer experience across all channels better and boost customer satisfaction.
Improved accounting procedures
MuleSoft Integration with Salesforce offers a platform that makes it simple for Salesforce to integrate with ERP and finance programs like SAP, NetSuite, and Oracle EBS. This platform also makes it easier for teams to monitor business finances.
Connecting various apps
The mobile app from Salesforce1 makes it simple and quick to create internal and external mobile and web applications. MuleSoft offers a platform that makes it simple to connect these apps, further increasing organizations’ productivity.
Efficient use of time
For a Salesforce.com integration project, coders often spend much time building custom code. Still, MuleSoft offers a custom integration platform that saves time so coders can devote their productive time to other projects.
Prerequisites
- A functioning MuleSoft Anypoint Platform for a Salesforce Integration account is required.
- A Salesforce developer account is required.
- You must have a foundational understanding of Mule Anypoint Studio.
- You should have the most recent version of Anypoint Studio installed.
- If you want to copy a security token for authentication, you should have an email address registered.
MuleSoft and Salesforce Integration Examples are used to clarify.
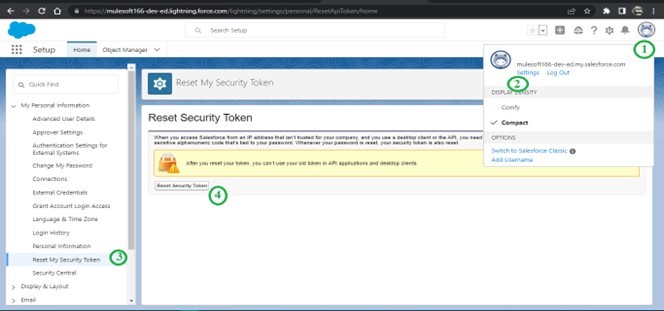
Let’s begin MuleSoft Salesforce Connector with the Mule Salesforce Connector. You must log into the salesforce developer’s Account before starting our integration. Go to Profile -> settings -> Reset security token after successfully logging in. Take each of the number notations in turn. Salesforce will then send you an email to the address on file asking you to reset your security token.
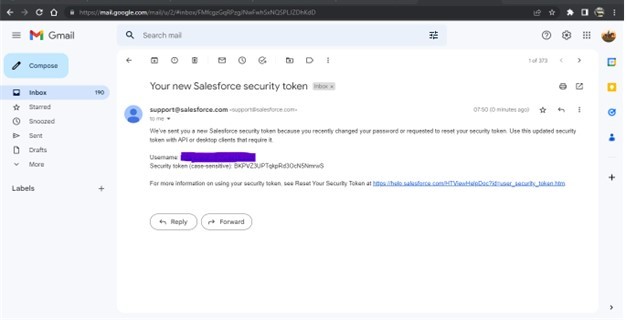
You will receive the Salesforce login and security token, as shown below, which should be sufficient to complete the basic authentication.
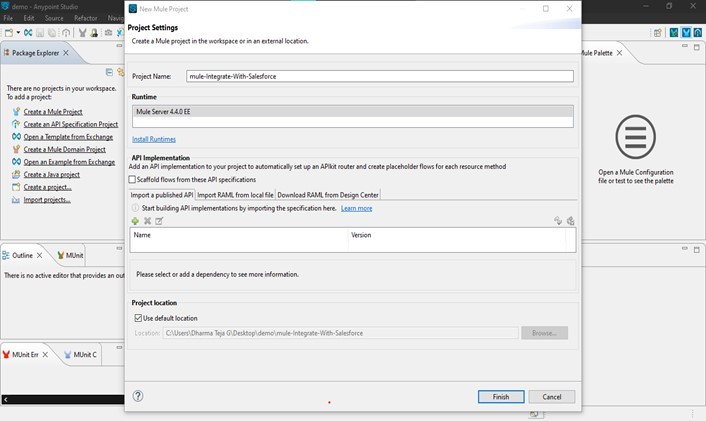
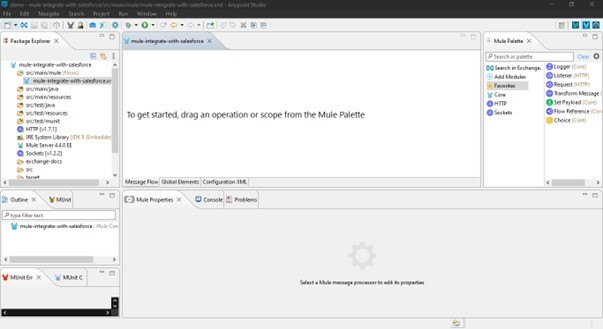
Step 1: Start a New Project
Once authentication has been completed successfully, you must establish a new project with a suitable name, such as “mule-integration-with-salesforce”. To do that, open Anypoint Studio and select File > New > New Project. Name the project “mule-integration-with-salesforce” and then choose Finish.
As seen below, the project was made under the name “mule-integration-with-salesforce”.
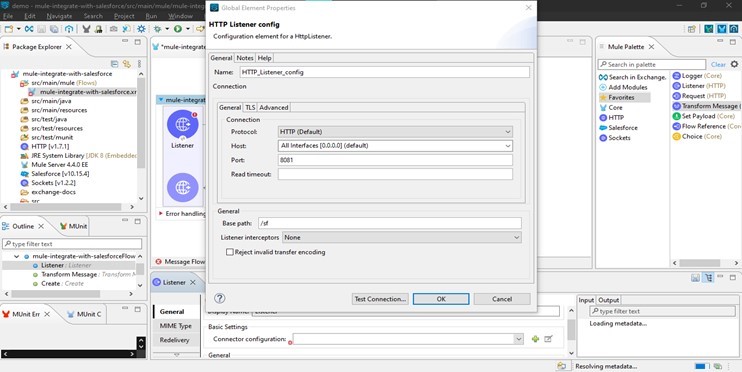
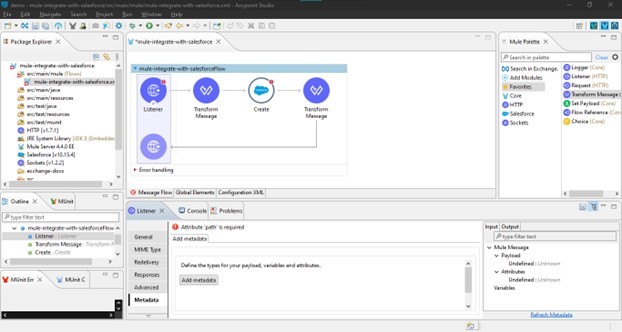
Step 2: Add Mule Connectors
Drag and drop the mule connectors from the mule palette in the following step. For instance, to use the HTTP listener connector, drag and drop the HTTP listener into the canvas and configure it with the host, port, and path indicated below.
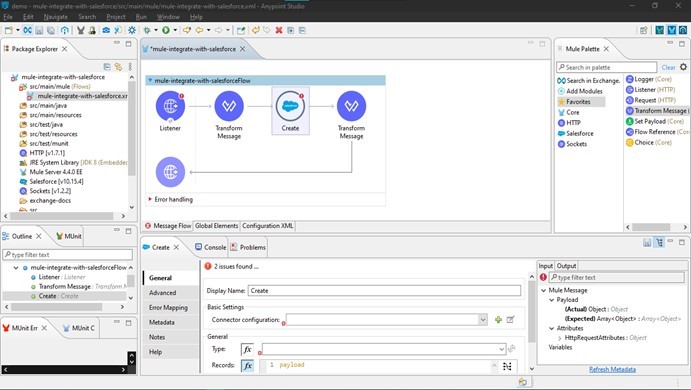
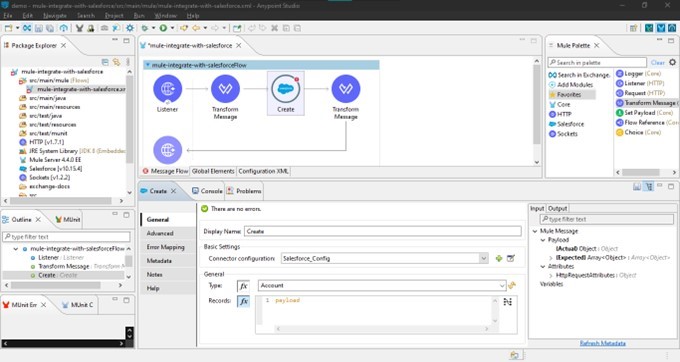
Drag and drop the necessary fundamental connectors to link with Salesforce after adding the source in the process area, such as the Create connector shown in the below figure.
Step 3: Set up the Salesforce “Create” Connector
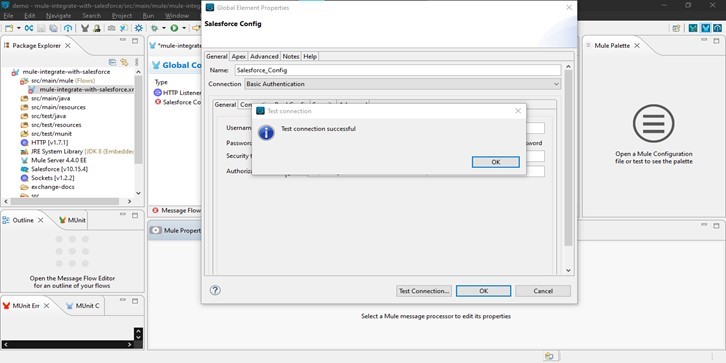
Go to Connection settings in the following step and press the plus (+) sign. Select Basic Authentication as the connection configuration type, and then enter the connection information listed below:
- Username: <salesforce_account_username>
- Password: <salesforce_account_password>
- Security token: <security_token_received_in_email>
- Authentication Url: https://login.salesforce.com/services/Soap/u/55.0
Click Test Connection after entering the necessary information. If all of the provided information is accurate, the result will be displayed as successful; otherwise, it will fail due to some missing or erroneous information provided error.
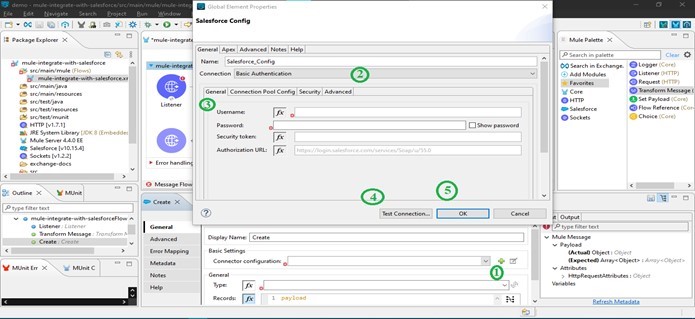
Click OK to finish the salesforce connection configuration after a successful test connection.
Step 4: Include Metadata
Define the input metadata in the HTTP listener as the next step. So, after choosing the Listener, go to the left side panel and enter metadata there. You must next determine the output payload, add information, and update it (pencil mark), as shown below.
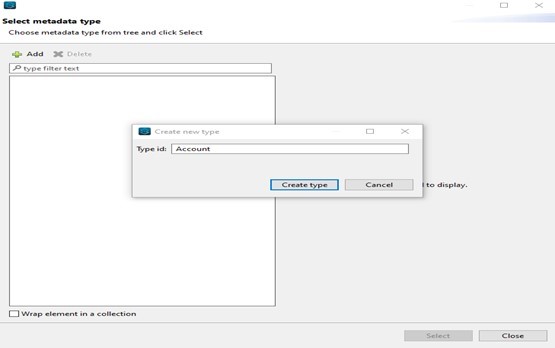
You must click Add and enter the Type ID in the select metadata type dialogue. You can select Create Type and enter a suitable name, such as Account, as seen below.
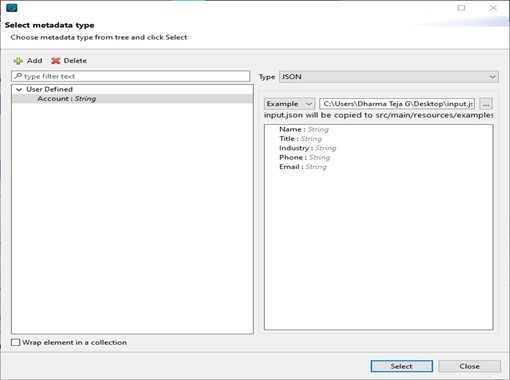
Then choose JSON from the Type drop-down menu. Then, after choosing Example from the drop-down menu, browse to the input.json file’s designated location, described below.
Step 5: Determine the kind of object.
You must then navigate to the General section of the Salesforce Create connector attributes and choose the Account salesforce object type (click the refresh button to make the Type visible).
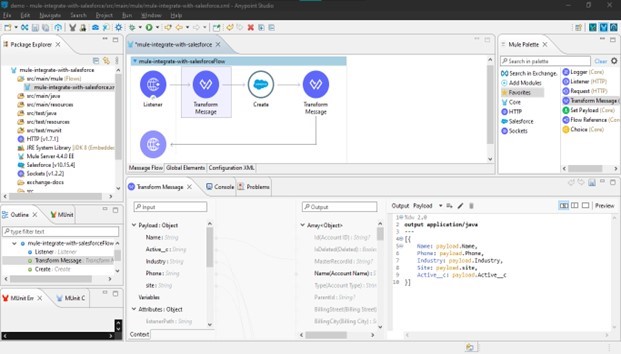
Step 6: Change the message
Now fill out the convert message’s data map with records from Salesforce account objects. Transform the message attributes in the input metadata we gave through the input.json file on the left, and then transfer the input to the output in the salesforce account object data field on the right by simply dragging and dropping the fields, as seen below.
Step 7: Verify the Status of Account Objects
This week, you can check out the salesforce account object in New before we perform the POST request to update the Accounts record. It is empty, and no records have been created, as indicated below.

Step 8: Configure the Postman request
Now that Postman is set up send a call to the record-creation API at http://localhost:8081. As an illustration, we’ll use the POST method with the following request body:

Step 9: The Postman’s reply
You should receive an HTTP response code of 200 after sending the request, indicating that it was successfully fulfilled.

Step 10: Verify Account Object
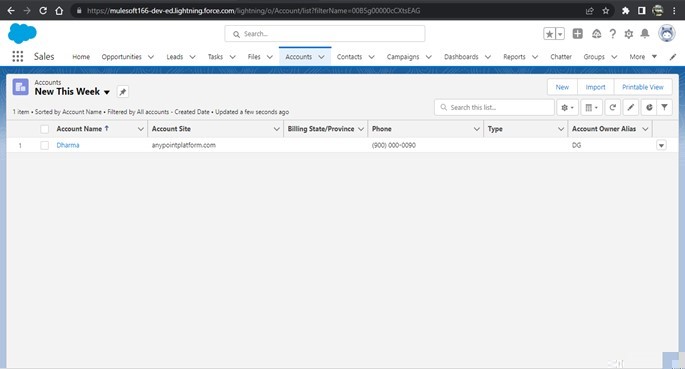
The record will be successfully inserted into the salesforce account object after being submitted through HTTP through Postman, as shown below.
MuleSoft for Salesforce Integration “Update” Connector
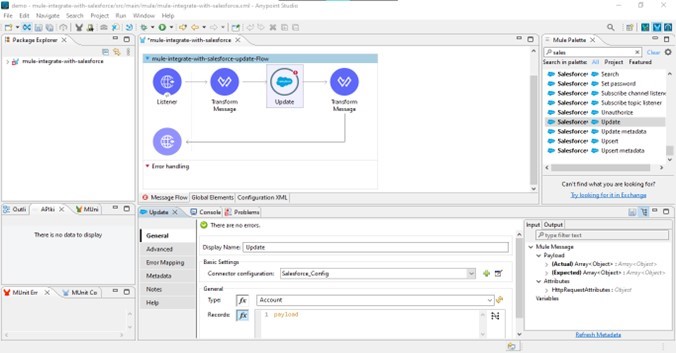
Mule connectors connect or integrate with any system without using bulk code. Mule salesforce update connectors, for example, interact with Salesforce utilising an update function. Use the salesforce update connection and the accompanying mule connectors shown in the below figure to establish a mule flow in Anypoint Studio.

You must do the following actions to configure the Salesforce update connector: –
Step 1: Update the Connector
Salesforce update connection is a feature that allows you to update records in Salesforce based on record ids. Every record has a distinct unique identifier. As before, we will configure the Connector in this instance by choosing Salesforce Global configuration and Type of salesforce object as Account, and then save it. It should resemble the following:
Step 2: Submit an update request
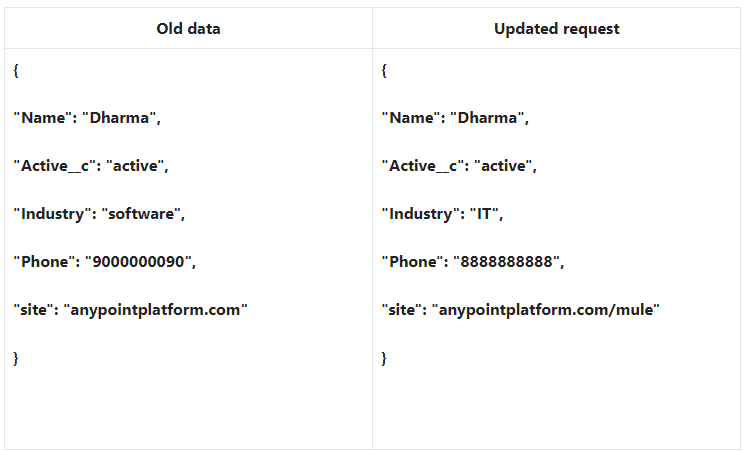
Once updated, include the appropriate Salesforce Record ID. Here, we’re modifying three columns: the first, Industry, which has been changed from software to IT; the second, Phone; and the third, Site URL, as indicated below.
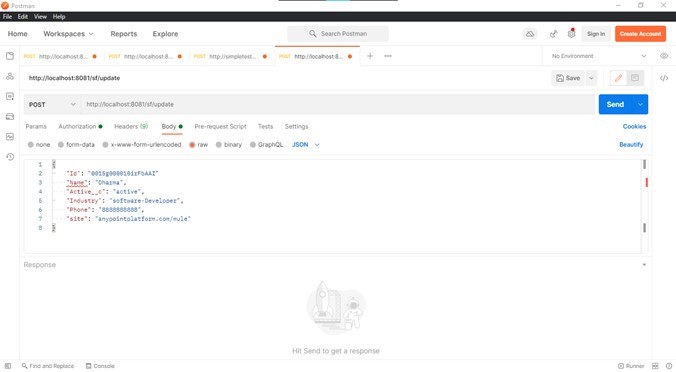
Step 3: Launch the Mule Application
As demonstrated below, the next step is to install the Mule application on a local workstation and deliver the revised request through Postman. This time, the request is made to the SF/Update API at localhost:8081.
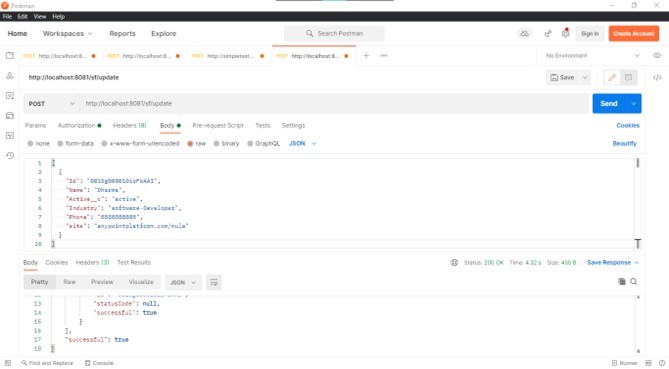
As seen in the Example below, the Postman successfully responded when he returned.
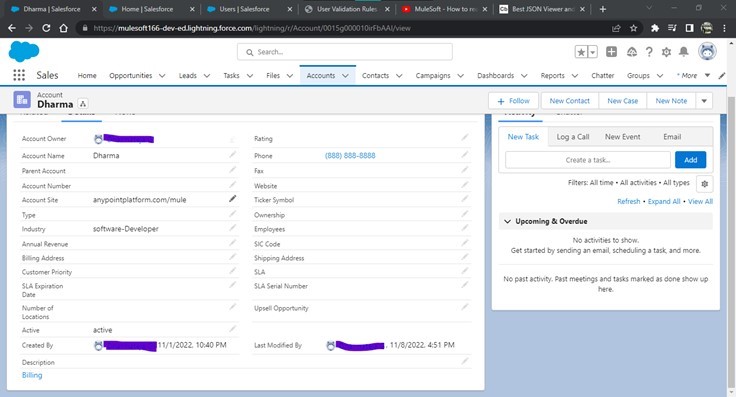
Step 4: Verify the status of the record
Now, if you refresh the website to check the status of the Salesforce record, you will see that the document has been successfully updated with the new details you can see below.
With this, the MuleSoft Data Integration with Salesforce is successfully finished.
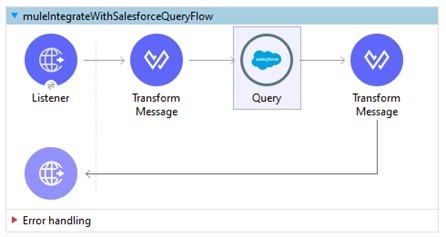
MuleSoft-to-Salesforce Integration “Query” Connector
Our goal in this flow will be to obtain all account objects in the Postman answer.
Step 1: Install the Salesforce Connector.
- Please create a new flow and give it a relevant name.
- Drag and drop the source over to the HTTP listener.
- Select the process section’s transform message connector.
- The Salesforce Query Connector should then be added.
- Place one more Transform Message connector last.
Step 2: Setting up each Connector
- Set up the HTTP listener with the fundamental information, including host, port, base path, and subpath.
- The Transform Message Connector won’t change; the default JSON media type will be chosen for the output media format instead.
- The Salesforce Query Connector settings will then stay the same as what we had before. We only need to configure a SQL query in addition. As an illustration, the query SELECT Id, Name, Active, Industry, Site, Phone FROM Account is used here.
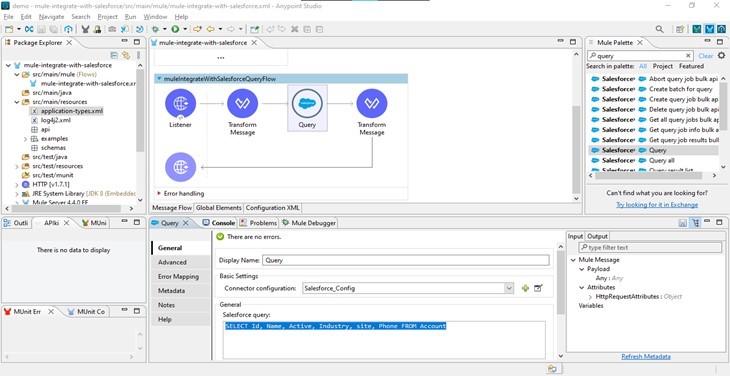
- Lastly, The output media type for Transform Message Connector needs to be updated to JSON format.
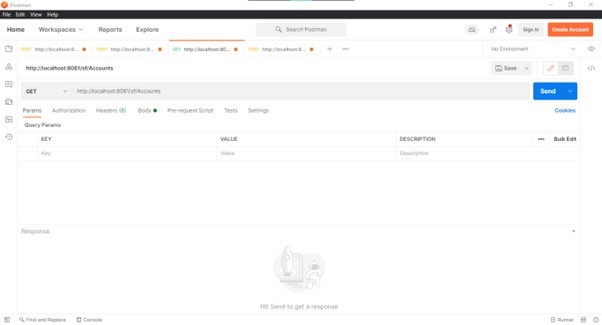
Step 3: Install and test the Mule application
The Mule Application can now be executed on your machine. You may now examine every configuration deployed on your local system. You can test the settings after it has been deployed successfully by submitting a GET Request, as shown below.
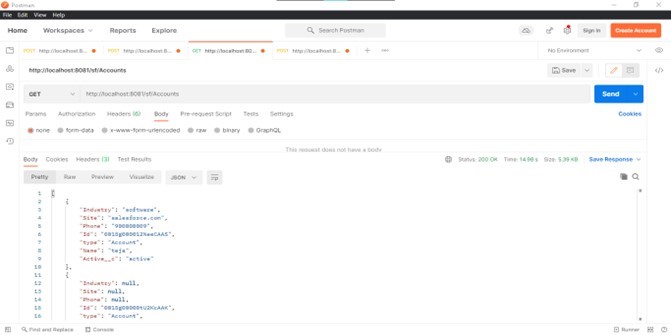
If the Postman request is successful, you will see all the Salesforce Account Object records in the response body, as shown below.
Know more about Salesforce Integration Also, if you have any queries then contact us.
 Bio
Bio